Nail Art | Nautical Mani Swap with @EgyptianMani

image
Originals to the left, recreates to the right.

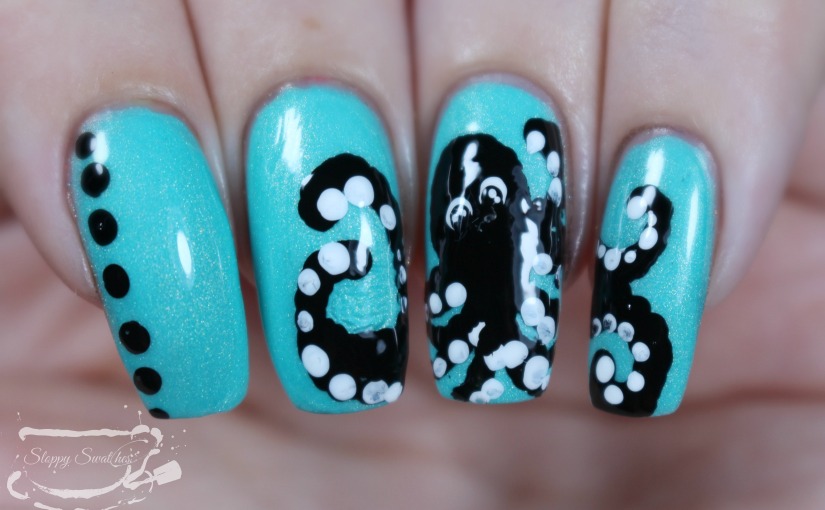
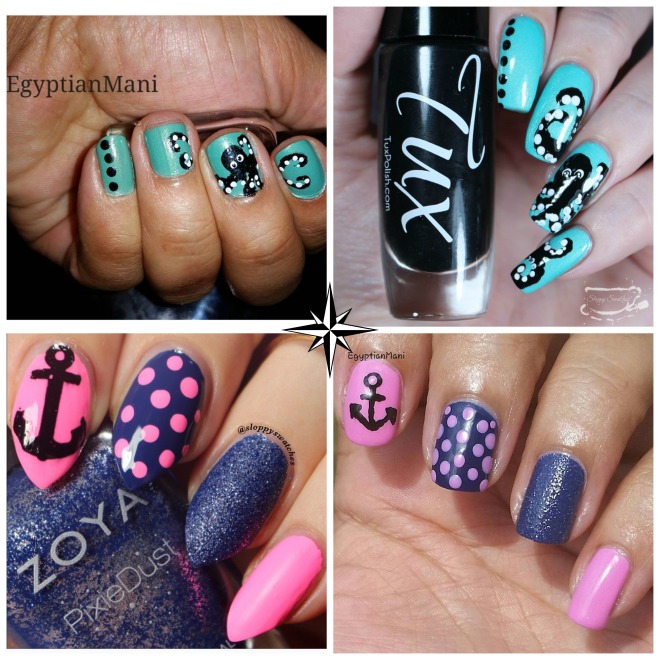
I’m so incredibly pleased to share this month’s mani swap with you! I had the honor of swapping with @egyptianmani and had a super easy time narrowing down just what look I wanted to recreate! It just doesn’t get any cuter than this happy little octopus especially as summer winds down, you should totally head over to EgyptianMani’s page and check out the original as well as her recreate of my anchored dotted nautical nails!

These were actually pretty simple to do and so much fun! I started with a base of China Glaze’s What I Like About Blue before using a dotting tool and Tux Polish‘s Onyx (releasing September 23rd!) I made the rounded tentacle shape and octopus outline. Once that was nice and opaque I used the dotting tool and Pure to add suction cups to the tentacles and the whites of the eyes for the octopus. I then used a smaller dotting tool and added some black pupils and white shine detail to the eyes and dotted down my index nail. Then I topped everything off with glossy topcoat and this is the final result:


img_4014-2
Completed Olly mani under artificial lighting.
img_4007
Completed Olly mani at an angle under artificial lighting.
img_4008
Completed Olly macro under artificial lighting.
img_4020
A quick view at all the products used.

So that wraps up this month’s mani swap, be sure to head over and give egyptianmani love from me and thanks so much for reading along!

NailArt | Nautical Mani Swap with @ThePolishedMage

IMG_2612

I am so excited to share this month’s BHB Mani swap with y’all! I was teamed up with the ever amazing @thepolishedmage, I seriously have so much nail envy every time I see her gorgeous claws. You should definitely check her out and send her love from me, she absolutely killed my nude look!

These nautical nails were originally inspired by another nail friend of ours, the ever-sweet @theweekendpolisher! I was honored to recreate Trish’s look, this is my final result:

IMG_2174
Final nautical matte mani under artificial lighting.

To complete this looks I used Zoya Nail Polish in the shades Purity, America, and Sailor. I started with a base coat of 2 coats of Purity. I topped that off with a generous topping of Glossy Seal and allowed to dry. Next I used a stripping brush and both America and Sailor to free hand some chevron stripes. On second thought I really should have used stripping plate! I then stamped the anchor on using Sailor once more, topcoat with Glossy Seal (which smeared like crazy) and finished off with a matte topcoat.

IMG_2164_Fotor
Final matte mani at an angle under artificial lighting.
IMG_2166_Fotor
final matte macro under artificial lighting.
IMG_2179_Fotor
Final matte mani under artificial lighting.

Don’t forget to head over to @thepolishedmage and send her love, and stay tuned for next month’s mani swap!

Maniswap | Mermaid Watermarble Nails with @Sassy_Manis!

Hey guys! today I have a really fun maniswap that I recently got to do with @sassy_manis! She chose to recreate my plaid nails and I opted to try my hand at her water marble mermaid nails! Definitely check out her instagram to see more information on her solo!

image
Originals to the left, recreates to the right.

To begin I laid down a base of Zoya Purity on all of my nails save my pink and thumb. On my pink and thumb I added 3 coats of Sally Hansen’s Mermaid Tale along with some larger holographic circle glitters from a different polish. I prepped my nails by applying I Peel Good along my cuticle area and around my finger tips. I then used mermaid vinyls from Vibrant Vinyls that were sent to me for review and applied them on my white nails. I used my finger tips to make sure they lay flush and then prepped my small teacup for marbling.

I filled my teacup with room temperature bottles water and used Zoya’s Dory, Robyn, and Ness to make as many rings as possible in my bullseye. Next I used my rhinestone tool to make a linear design before dipping my nails in to the water. I removed my vinyls and latex as quickly as I could and did minimal cleanup before top coating. This is the final result:

maniswap
Completed mani under artificial lighting
IMG_8336
Completed mani at an angle
IMG_8337
Completed macro

If you’d like to save 10% off of your order at vibrantvinyls.com you may use my coupon code SLOPPY and be sure to head over to @sassy_mani to send her love from me! Thanks so much for reading along!

NailArt | Mermaid Scale Maniswap With @baes_nails

image
Originals to the left, recreates on the right

Hey guys, today I am beyond honored to bring you a maniswap I got to do with @baes_nails. She is so incredibly sweet and talented, check out how she did her version of my stamped neon smooshy nails!

I started out with a matted base of Raven’s Writing Desk from the Simply Mad For Tea collection by Lifestyle Lacquer that I reviewed here that is releasing on May 13th.

RavensAngleMatte
Raven’s Writing Desk with matte topcoat at an angle.

Next I used item #23018 in option T6 from bornprettystore.com as a stencil for a mermaid scale gradient. I cut the pieces down to my nail size, peeled them up using tweezers,placed them on the back of my hand to reduce stickiness and then pushed them flush to my nail. I then used a makeup sponge and Zoya’s Solange and Chita to dab a gradient over the decal. I then removed the decal using tweezers and did a ton of clean up using acetone and a clean up brush. I greatly recommend using a liquid latex around your cuticle area!

IMG_6278
Item #23018
IMG_6281
Chita and Solange gradient on a makeup sponge
IMG_6268
Finished Mermaid gradient without topcoat under artificial lighting
IMG_6274
Mermaid gradient at an angle under artificial lighting.
IMG_6276
Mermaid Gradient Macro
IMG_6289
Mermaid Gradient plus topcoat at an angle in direct sunlight.

So that rounds out this month’s Maniswap, head over to Bae’s instagram and send her love from me and thank you for reading!